Keys Service
On this page
Introduction
The keys service in the Oasis Loss Modelling Framework is the process which is used to map exposure data (in OED format) into the into the model specific keys required to execute analyses against that model in the core calculation kernel. This document specifies the requirements form the keys service for a typical implementation of an Oasis LMF compliant model. It should be noted that this document does not cover the example of a complex model implementation, where the requirements are much more loose, but focusses on the standard implementation where all of the regular ktools components are utilised in the calculation kernel.
High Level Overview
At a high level, a keys service implementation should accept, as input, an OED Location file and return a JSON stream including the oasis keys per location/coverage type/sub-peril, along with reasons for non-mapped location/coverage-type/sub-peril combinations where they are outside of the remit of the model
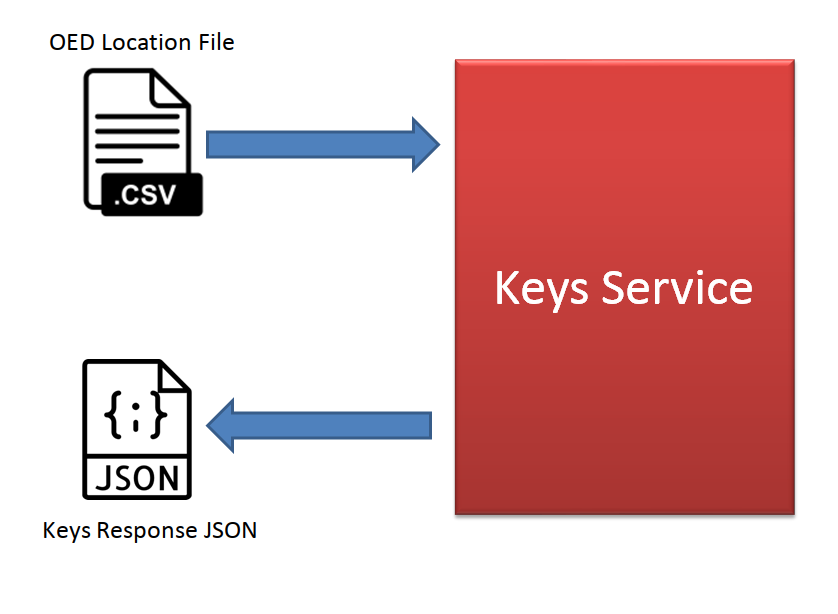
However, this is not strictly true anymore. Keys service can return a csv stream OR a JSON stream. The default is to return csv, as this form is more efficient and practical.
Return JSON specification
The return JSON should subscribe to the following definition:
{
"loc_id": <integer location id from input OED file>,
"peril_id": <sub-peril id for model (see below)>,
"coverage_type": <coverage type id (see below)>,
"area_peril_id": <integer id of the area peril in the footprint file>
"vulnerability_id": <integer id of the vulnerability function in the vulnerability file>,
"status": <one of the accepted statuses (see below)>,
"message": <message to accompany status>
}
Perils Covered
It is the responsibility of the keys service to identify the exposures in the input location file are to be modelled. Included in this definition is the identification of risks by perils covered. The keys service implementation should use the “LocPerilsCovered” field in the input location OED file to identify and filter out those locations which are covered by the model and those which are not. If a location in the input file has only location perils covered which are not considered by the model, then this location should receive a failure status (see below), be rejected by the keys service and not be assigned an areaperil id value.
Coverage Type
The coverage type field returned in the JSON stream should comply to the Oasislmf standard supported coverage types:
1: Buildings
2: Other
3: Contents
4: Business Interruption (BI)
Status
The status returned by the keys service should comply with the accepted status values included in the oasislmf package. These accepted statuses are:
success: the location/coverage type/sub-peril combination has an area peril and vulnerability id mapped
fail: the location/coverage type/sub-peril combination has neither area peril or vulnerability id mapped
fail_ap: the location/coverage type/sub-peril combination has no area peril but a successful vulnerability id mapped
fail_v: the location/coverage type/sub-peril combination has a successful area peril but no vulnerability id mapped
notatrisk: the location/coverage type/sub-peril combination is within the realm of the model but deemed to be not at risk. This can be used to show that the risk is considered (and so the TIV will be counted in any exposure metrics) but will never generate a loss from the events in the footprint.
notmodelled: the location/coverage type/sub-peril combination has a peril which is outside of the scope of the model
(i.e. not one of the perils modelled), as distinct from notatrisk which is used for perils that are modelled but for
which the specific risk is not at risk.
Note
There are two additional defined statuses but these should not be included in the keys service return:
nomatch: this is a legacy status which is no longer used
noreturn: this is a status used by oasislmf to highlight exposure records for which no keys service returns were made, wither successful or not.
Messages
A free text message can be returned with the keys service return JSON. This message should be used to describe the reason for no oasis key being assigned (e.g. location is outside of model domain) and should be concise while clear enough for a user to understand the issue. Messages only need to be returned with one of the fail statuses.
Best Practice
The following list details the expectations from the keys service implementation:
OED location file fields: The keys service implementation should accept valid OED location file fields
Case Sensitivity: The OED field names should not be case sensitive, so the keys service implementation should not be sensitive to a particular format
Peril mapping: It is the responsibility of the keys service to interpret the “LocPerilsCovered” field in the OED input file and assess whether the risk is in scope for the model or not.
Complete reporting: The keys service should return records for all risks submitted in the input location file. If a risk is deemed to be out of scope, then the keys service should report that back to oasislmf and not simply ignore the record.
Coverage Types: The keys service implementation should return records for all coverage types which are included in the model. If the model does not include damage for a particular coverage type at all (e.g. BI) then there is no need to return any values for this coverage type.
Not at Risk: If a risk is deemed to be within scope for the model but not at risk for any of the events in the footprint, then the record should be returned with the “notatrisk” status and not with a dummy areaperil value, say. Not at risk items will be included in exposure counts but will not be entered into the calculation kernel.
Interface for Keys lookup
The Keys look up process interface now has a new generic interface in order to reduce the amount of code needed to define and run a keys look up process.
Setup
Basic execution
This section goes through step by step on how to run a basic model.
Before we use the new interface we should explore how we run the lookup process in general. This can be done with the command below:
oasislmf model run --config ./us_oasislmf_mdk.json
What we have done is merely run the model using the oasislmf pip module. Here we have to define the config file. If we look at the config file for this example, we get the following contents:
{
"analysis_settings_json": "analysis_settings.json",
"lookup_data_dir": "keys_data/US_FLOOD",
"model_data_dir": "model_data/US_FLOOD",
"model_version_csv": "keys_data/US_FLOOD/ModelVersion.csv",
"oed_accounts_csv": "tests/exposures/test_acc.csv",
"oed_location_csv": "tests/exposures/test_loc_10_eve1.csv",
"write_chunksize": 200000,
"lookup_config_json": "keys_data/US_FLOOD/new_key_server.json"
}
What we have is the parameters for the execution of the model which we will explore in the general config subsection.
It has to be noted that the lookup_config_json parameter is the one that we add if we want to use the new interface as
this is the lookup config that defines the steps for the
lookup. The process behind running the keys lookup happens in the oasislmf package
via the steps below:
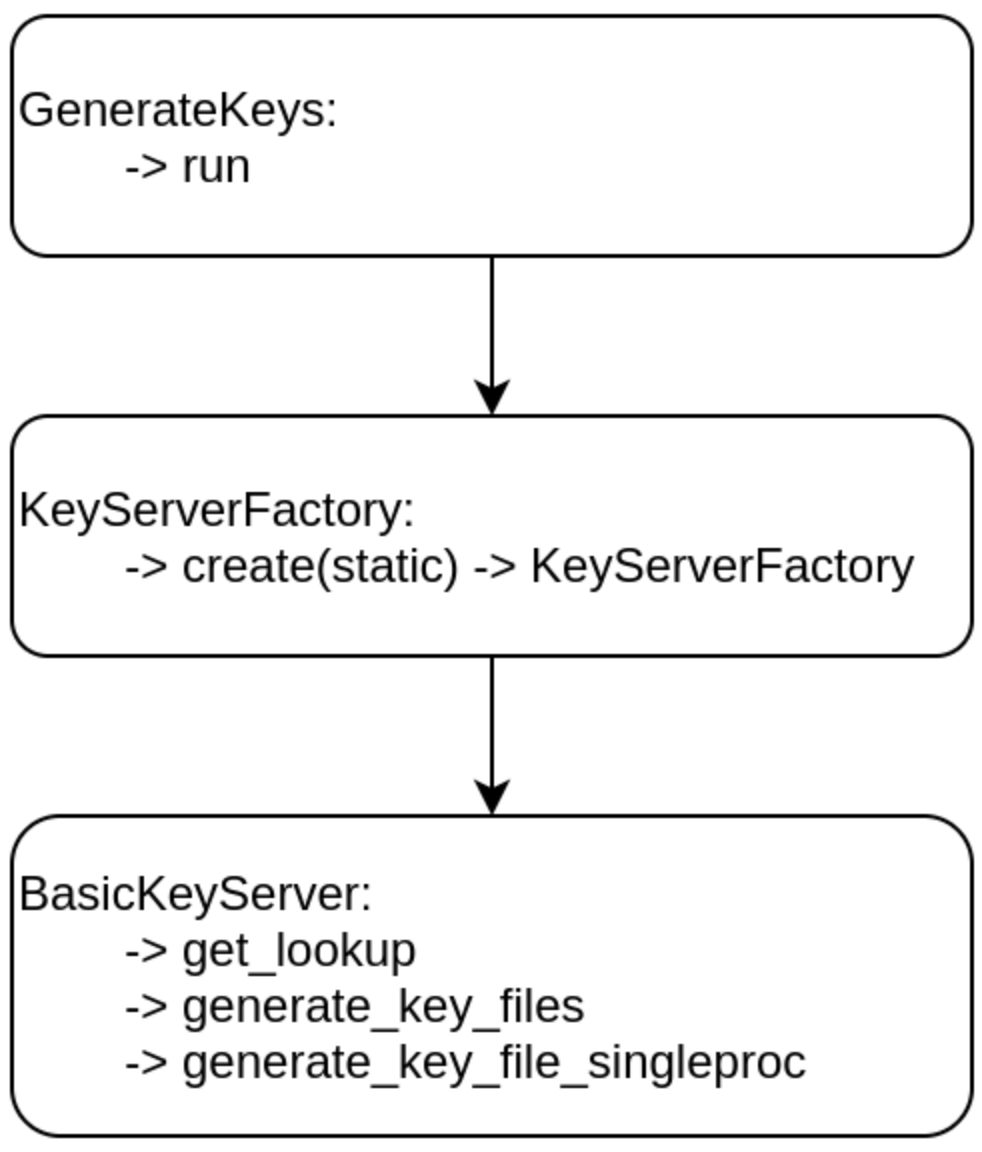
Once the flow above has executed, the class that you have defined that inherits the Lookup class
(Lookup). This then runs the
process_locations function which will run the series of functions defined in the that are defined in the “strategy”
section. When it comes to the process_locations function we do not overwrite it as the process_locations function
in the base Lookup class is the function responsible for going through the stratergy list in the config. If we
define a function in the strategy list, the process_locations function checks to see if our class has this. If it does
not, then it runs a build function around this, assigns it to the return function as an attribute under the name of the
step to our class and fires this. This may seem a little convoluted but do not worry, we will cover this more in depth now.
First of all, we have to acknowledge that every step function has to return a pandas data frame that will get fed into the
next step function. For our first example, we will build a function that will accept parameters and return a data frame.
For this mini example, we will accept two integers and a string for a column name. We will then add the two integers and
assign the result for ever row under the name of the column. We will call this function simple_add which can be defined
with the code below:
def build_simple_add(one: int, two: int, name: str) -> "_internal_function":
   """
   This function builds the _internal_function making it ready to be called.

   :param one: (int) the first number to be added
   :param two: (int) the second number to be added
   :return: (_internal_function) the internal function ready to be called with a dataframe
   """
   def _internal_function(locations: DataFrame) -> DataFrame:
      """
      Adds the parameter one and two together and assigns it to a column under the name parameter.

      :param locations: (DataFrame) the dataframe to be processed from a previous step
      :return: (DataFrame) the input dataframe with the new column
      """
      locations[name] = one + two
      return locations
   return _internal_function
As long as this function is defined in our lookup class that we have defined which inherits the Lookup class, we can
call it in our lookup config file with the setup below:
{
   "model": {
      "supplier_id": "OasisLMF",
      "model_id": "PiWind",
      "model_version": "0.0.0.1"
   },
   "builtin_lookup_type": "new_lookup",
   "keys_data_path": "./",
   "step_definition": {
      "simple_add": {
            "columns": ["example"]
            "type": "simple_add",
            "parameters": {
               "one": 1,
               "two": 2,
               "name": "example"
            }
      }
   }
   "strategy": ["simple_add"]
}
This will run our simple_add function with the parameters defined in the JSON file above. Once the strategy sequence
has finished the final result data frame will be passed forward for further processing. Even though we have built our
build_simple_add function we have to ensure that we do not have a simple_add attribute or function defined in our
class otherwise this will try and run and the build_simple_add function will not be touched. It also has to be noted
that we have signposted our ["example"] column name in the "columns" field. This is to ensure that our example
field is not wiped at the end of the process.
Built-in functions
combine
Build a function that will combine several strategies trying to achieve the same purpose by different means into one.
For example, finding the correct area_peril_id for a location with one method using (latitude, longitude)
and one using postcode.
id_columns: columns that will be checked to determine if a strategy has succeeded.
strategy: list of strategy step names to apply, in order.
logical_type:'or'(default) or'and'.'or': each strategy is applied sequentially, only on the locations that still haveOASIS_UNKNOWN_IDinid_columnsafter the preceding strategy.id_columnsis a flat list.'and': each strategy is applied sequentially, only on the locations that succeeded (i.e. have a valid id) in the preceding strategy.id_columnsmust then be a list of lists, one sublist of columns checked per strategy step.
‘or’ example (note: id_columns is a list):
"vulnerability": {
    "type": "combine",
    "parameters": {
        "id_columns": ["vulnerability_id"],
        "strategy": ["vuln_cov_Building_Content", "vuln_cov_car"],
        "logical_type": "or"
    }
}
‘and’ example (note: id_columns is a list of lists):
"vuln_cov_car": {
    "type": "combine",
    "columns": ["autocode"],
    "parameters": {
        "id_columns": [["vuln_id_car"], ["vulnerability_id"]],
        "strategy": ["vulnerability_car", "coverage_type_car"],
        "logical_type": "and"
    }
}
interval_to_index
Map a value column to an index according to its position in the interval defined by sorted_array. NaN values are
kept as NaN.
value_column_name: name of the column to map.
sorted_array: sorted values defining the interval boundaries to map to, either given directly as a list or as a
path to a csv file containing one value per line.
index_column_name: name of the output column. Defaults to <value_column_name>_idx.
side: 'left' (default) or 'right'; defines which index is returned in case of equality with one of the
interval boundaries (see numpy.searchsorted).
split_loc_perils_covered
Split the value of LocPerilsCovered (or PolPerilsCovered) into multiple lines, taking peril group into
account.
model_perils_covered: if given, drop all lines that are not in this list, and set any location left with no
covered peril to the status given by not_covered_status.
not_covered_status: status key to assign to locations with no peril covered by the model. Defaults to
notmodelled.
Note
Prior to this status being introduced, uncovered perils were assigned notatrisk. Models that rely on this
older behaviour (e.g. to keep such locations in TIV-based exposure metrics rather than excluding them as
unmodelled) can restore it by setting not_covered_status to notatrisk:
"split_loc_perils_covered": {
    "type": "split_loc_perils_covered",
    "columns": ["locperilscovered"],
    "parameters": {
        "model_perils_covered": ["WTC", "WSS"],
        "not_covered_status": "notatrisk"
    }
}
set_status
Set the status (and optionally message) of locations from a model-developer-supplied column.
Allows a model developer to explicitly mark locations (e.g. as notatrisk or notmodelled) based on their own
criteria (a spatial mask, a lookup table, …) merged into the Locations DataFrame ahead of this step, rather than relying
on the implicit success/fail logic derived from area_peril_id/vulnerability_id.
status_column: name of the column containing the status to set for each location. Rows where this column is empty
keep whatever status was already set. Any non-empty value must be one of the valid statuses (see the Status section
above), otherwise an OasisException is raised.
message_column: name of the column containing the message to set alongside the status. If not provided, the message
is left untouched. Rows where this column is empty keep whatever message was already set.
prepare
Prepare the dataframe by setting default, min and max values and type.
- Support several simple DataFrame preparation:
default: create the column if missing and replace the nan value with the default value
max: truncate the values in a column to the specified max
min: truncate the values in a column to the specified min
type: convert the type of the column to the specified numpy dtype
Note
We use the string representation of numpy dtype available at https://numpy.org/doc/stable/reference/arrays.dtypes.html#arrays-dtypes-constructing.
rtree
Function Factory to associate a location to a geometry (e.g. area_peril) based on the rtree method.
Note
!!!
Please note that this method is quite time consuming (especially if you use the nearest neighbor option).
If your geometries are square, you should use the fixed_size_geo_grid function instead.
!!!
file_path: is the path to the file containing the geometries.This file must be a geopandas Dataframe with a valid geometry
An example on how to create such dataframe is available in PiWind
If you are new to geo data (in python) and want to learn more, you may have a look at this excellent course:
file_type: can be any format readable by geopandas (‘file’, ‘parquet’, …)See: https://geopandas.readthedocs.io/en/latest/docs/reference/io.html (you may have to install additional library) such as pyarrow for parquet
id_columns: column(s) to transform to an ‘id_column’ (type int32 with nan replaced by -1)
file_read_params: optional extra keyword arguments passed to the geopandas file reading function.
nearest_neighbor_max_distance: option to look for the nearest neighboring geometry, up to this distance away (in metres, as a Euclidean distance), if no containing geometry is found.
Note
nearest_neighbor_min_distance and area_peril_read_params are deprecated aliases for
nearest_neighbor_max_distance and file_read_params respectively, and may be removed in a future version.
Geometry files without CRS metadata are assumed to be in EPSG:4326; any other CRS is reprojected to EPSG:4326.
If the geometry file has a peril_id column, the geometry is only applied to locations with a matching peril_id.
fixed_size_geo_grid
Associate an id to each square of a grid defined by the limits of lat and lon.
lat_reverse/lon_reverse: change the ordering of ids along that axis from (min to max) to (max to min).
lon_first: order ids by iterating over longitude before latitude.
fixed_size_geo_grid_multi_peril
Create multiple grids of varying resolution, one per peril, and associate an id to each square of the grid using the
fixed_size_geo_grid method for each peril.
perils_dict: dictionary with peril_id as key and a fixed_size_geo_grid parameter dict as value, i.e.
{'peril_id': {fixed_size_geo_grid parameters}}. The ids of each per-peril grid are offset so they do not collide.
fixed_size_z_index_geo_grid
Associate an id to each square of the grid defined by the limits of lat and lon, using z-order (Morton) indexing
instead of linear ordering. Takes the same parameters as fixed_size_geo_grid.
fixed_size_z_index_geo_grid_multi_peril
Create multiple z-order indexed grids of varying resolution, one per peril, using the fixed_size_z_index_geo_grid
method for each peril. Takes the same perils_dict parameter as fixed_size_geo_grid_multi_peril.
geotiff
Build a lookup function that assigns geotiff band values to each location from its latitude/longitude.
file_path: path to the geotiff file.
band_info: a dict where keys are the assigned column names, and values are dicts with:id: the id of the band in the tiff filedefault: the value for locations outside of the geotiff’s range
Note
Requires gdal to be installed, see the error message raised at build time for installation instructions.
h3
Function factory to look up area_peril_id using H3 hexagonal grid indexing.
Converts latitude/longitude to an H3 cell at the specified resolution, converts the cell to its int64
representation, then maps it to an area_peril_id using a mapping file supplied by the model provider. The mapping
file must contain at least the columns h3_int64 (H3 cell index as a 64-bit integer, must be unique) and
area_peril_id (Oasis area peril id, must be an exact integer on every row). A location whose coordinates are
null, infinite, or absent from the mapping file resolves to OASIS_UNKNOWN_ID (reported as a per-location fail
status).
resolution: H3 resolution level (0-15). Higher values produce finer cells.
file_path: path to the int64 to area_peril_id mapping file. Supports the %%KEYS_DATA_PATH%% placeholder.
file_type: pandas read function suffix ('csv', 'parquet', etc.). Defaults to 'csv'.
**kwargs: additional keyword arguments forwarded to the pandas read function.
Config example:
"h3_area_peril": {
    "type": "h3",
    "columns": ["latitude", "longitude"],
    "parameters": {
        "resolution": 5,
        "file_path": "%%KEYS_DATA_PATH%%/h3_to_areaperil.csv"
    }
}
Note
Requires the h3 package to be installed (pip install h3>=4).
merge
This method will merge the locations Dataframe with the Dataframe present in file_path.
All non matching columns present in id_columns will be set to -1.
This is an efficient way to map a combination of columns that have a finite scope to an id.
file_path: path to the file to merge with, supports the %%KEYS_DATA_PATH%% placeholder.
id_columns: column(s) to reset to -1 for rows with no match.
file_type: pandas read function suffix ('csv', 'parquet', etc.). Defaults to 'csv'.
**kwargs: additional keyword arguments forwarded to the pandas read function.
simple_pivot
Allow pivoting of columns of the locations dataframe into multiple rows.
- Each pivot in the pivot list may define:
on: to rename a column into a new onenew_cols: to create a new column with a certain value
remove_pivoted_col: if True (default), drop the original columns that were renamed by on once pivoted.
For example, with:
"pivots": [{"on": {"vuln_str": "vulnerability_id"},
            "new_cols": {"coverage_type": 1}},
           {"on": {"vuln_con": "vulnerability_id"},
            "new_cols": {"coverage_type": 3}}]
the input:
loc_id  vuln_str    vuln_con
1       3           2
2       18          4
becomes:
loc_id  vuln_str    vuln_con    vulnerability_id    coverage_type
1       3           2           3                   1
2       18          4           18                  1
1       3           2           2                   3
2       18          4           4                   3
model_data
Serialises the specified columns from the OED file into a model_data dict column, one dict per location, for
consumption further down the model pipeline.
columns: list of columns to serialise into model_data.
dynamic_model_adjustment
Converts specified columns from the OED file into intensity_adjustment and return_period columns, used for
per-location dynamic protection/adjustment in the model.
intensity_adjustment_col: column to copy into intensity_adjustment.
return_period_col: column to copy into return_period.
Config
Lookup config file
If we are to define a basic config file we can so with the following:
{
   "model": {
      "supplier_id": "OasisLMF",
      "model_id": "PiWind",
      "model_version": "0.0.0.1"
   },
   "builtin_lookup_type": "new_lookup",
   "keys_data_path": "./",
   "step_definition": {
      "peril":{
            "type": "rtree",
            "columns": ["latitude", "longitude"],
            "parameters": {
               "file_path": "%%KEYS_DATA_PATH%%/areaperil_dict.parquet",
               "file_type": "parquet",
               "id_columns": ["area_peril_id"],
               "nearest_neighbor_min_distance": -1
            }
      },
      "split_loc_perils_covered":{
            "type": "split_loc_perils_covered" ,
            "columns": ["locperilscovered"],
            "parameters": {
               "model_perils_covered": ["WTC", "WSS"]
            }
      },
      "create_coverage_type": {
            "type": "simple_pivot",
            "parameters": {
               "pivots": [{"new_cols": {"coverage_type": 1}},
                           {"new_cols": {"coverage_type": 3}}]
            }
      },
      "vulnerability": {
            "type": "merge",
            "columns": ["peril_id", "coverage_type", "occupancycode"],
            "parameters": {"file_path": "%%KEYS_DATA_PATH%%/vulnerability_dict.csv",
                           "id_columns": ["vulnerability_id"]
                        }
      }
   },
   "strategy": ["split_loc_perils_covered", "peril", "create_coverage_type", "vulnerability"]
}
General config file
The general config file has to have to following parameters:
analysis_settings_json: This points to a analysis settings config file https://github.com/OasisLMF/OasisLMF/wiki/Key-Server#analysis-settings-config
lookup_data_dir: This points to the directory of data that describes the data that describes the data of objects such as buildings and the location of the buildings within a grid.
model_data_dir: the directory of the data around the model. For instance, the probability of the event happening is housed in this data. This data is applied to the processed data from the look_up data which has coded the location of an asset such as a building in a grid square.
model_version_csv: the directory of the data that depicts the version of the model (seeing as this is just a single value, this could just be a direct value itself instead of reading a file for that single value)
oed_accounts_csv:
oed_location_csv:
write_chunksize:
lookup_config_json:
Analysis settings config file
A general analysis settings config file has the following layout:
{
      "gul_output": true,
      "gul_summaries": [
            {
               "aalcalc": true,
               "eltcalc": true,
               "id": 1,
               "lec_output": true,
               "leccalc": {
                  "outputs": {
                        "full_uncertainty_aep": true,
                        "full_uncertainty_oep": true
                  },
               "return_period_file": true
               }
            }
      ],
      "gul_threshold": 0,
      "model_settings": {
         },
      "model_version_id": "US_FLOOD",
      "module_supplier_id": "Fathom",
      "number_of_samples": 10
}
Custom lookup
On top of allowing user to set their own steps to create a lookup, Oasis builtin lookup provide a easy way to add your own custom functions if more complex behaviour are needed.
1. Creating a custom class
To create our own functions we first need to create our custom class that will inherit from the built-in lookup the simplest
way is to create a <module_name>.py file in the folder where your lookup_config.json file is (module_name can be
any name of your choice). In lookup_config.json change builtin_lookup_type: new_lookup, to
lookup_module_path: <module_name>.py.
In <module_name>.py we create our custom class <model_id>KeysLookup where <model_id> is the model_id in
your lookup config.
from oasislmf.lookup.builtin import Lookup

class MyModelLookup(Lookup):
   pass
This is done, Oasis will now use your custom lookup in the key server (although for the moment the custom lookup behave exactly like the built-in one).
You may want to have your custom lookup in a different path, it is possible lookup_module_path can be an absolute path
of a path relative to lookup_config.json.
There are two other ways to have oasis call your custom lookup class specifying in lookup_config.json:
lookup_modulewill load the module and use the class named'{self.config['model']['model_id']}KeysLookuplookup_classwill load and return the class from the python environment.lookup_class:my_package.MySpecialLookupwill do like “from my_package import MySpecialLookup”
2. Creating static function
If your custom function is static (doesn’t need have parameters) you can just add a static method to your lookup class with
the signature fct_name(locations)=>locations.
For example let’s say we want to have a default height if missing based on the number of storeys. With
numberofstoreys between 0 and 100.
from oasislmf.lookup.builtin import Lookup
import pandas as pd

class MyModelLookup(Lookup):
   @staticmethod
   def storey_nb_to_height(locations):
      missing_height_with_storeys = ~locations['numberofstoreys'].isna() & locations['buildingheight'].isna()
      loc_missing = locations[missing_height_with_storeys]
      loc_missing['buildingheight'] = locations['numberofstoreys'].clip(0, 100) * 3 # as a default each storey is 3 meters
      return pd.concat([loc_missing, locations[~missing_height_with_storeys]])
Then we can call our function by adding it in our strategy in lookup_config.json "strategy": ["storey_nb_to_height", ...].
3. Creating parametric function
You may want to have function that will depend on parameter that will be specify in you lookup config. Let’s take our storey example above and put the min max and storey heigh as parameters.
Then the code will be changed to:
from oasislmf.lookup.builtin import Lookup
import pandas as pd

class MyModelLookup(Lookup):

   def build_storey_nb_to_height(self, min, max, height):
      def fct(locations):
         missing_height_with_storeys = ~locations['numberofstoreys'].isna() & locations['buildingheight'].isna()
         loc_missing = locations[missing_height_with_storeys]
         loc_missing['buildingheight'] = locations['numberofstoreys'].clip(min, max) * height # as a default each storey is 3 meters
         return pd.concat([loc_missing, locations[~missing_height_with_storeys]])

      return fct
As the function has parameters, on top of adding the step name to strategy we also need to specify the parameter in step_definition:
"step_definition": {
  "default_height":{
      "type": "storey_nb_to_height",
      "columns": ["numberofstoreys", "buildingheight"],
      "parameters": {
         "min": 0,
         "max": 100,
         "height": 3,
      }
   },
  ...
}
"strategy": ["default_height", ...] # step name and function name can be the same but if different make sure it is the step name in strategy
Custom parametric function let you be as flexible as you need and also let you use builtin function. In this example we
will use custom function to use two different method of geo-localization depending on the data available. If we have lat
lon we use it otherwise we use a mapping file based on the locuserdef1 column.
from oasislmf.lookup.builtin import Lookup
import pandas as pd

class MyModelLookup(Lookup):
   def build_peril_methods(self, file_path_loc_id, file_path_rtree1, file_type_rtree,
                           nearest_neighbor_min_distance=-1, id_columns=[], **kwargs):
      merge = self.build_merge(file_path_loc_id, id_columns=[], **kwargs)
      rtree1 = self.build_rtree(file_path_rtree1, file_type_rtree, id_columns, nearest_neighbor_min_distance)

      def fct(locations):
         # get all invalid lat long and use locuserdef1
         null_gdf = locations["longitude"].isna() | locations["latitude"].isna()
         null_gdf_loc = merge(locations[null_gdf])

         # rtree method
         gdf_loc1 = rtree1(locations[~null_gdf])

         return pd.concat([gdf_loc1, null_gdf_loc])

      return fct
In lookup_config.json, we define the step and its parameters:
"peril_methods":{
   "type": "peril_methods",
   "columns": ["latitude", "longitude", "locuserdef1"],
   "parameters": {
      "file_path_loc_id": "%%KEYS_DATA_PATH%%/locuserdef1_mapping.csv",
      "file_path_rtree": "%%KEYS_DATA_PATH%%/areaperil_dict.parquet",
      "file_type_rtree": "parquet",
      "id_columns": ["area_peril_id"],
      "nearest_neighbor_min_distance": -1
   }
}