The Oasis REST API
Overview | Platform Architecture | Container Configuration | The Oasis REST API | Distributed Execution and Scaling | Configuration for Distribution and Scaling
The Oasis REST API (Representational State Transfer Application Programming Interface) is a set of rules and conventions for building and interacting with web services. It defines a standardized way for different software applications to communicate with each other over the internet. At its core, are standard HTTP methods (like GET, POST, PUT, DELETE) to perform operations on resources, which are typically identified by unique URLs. This architectural style emphasizes stateless client-server communication.
In the Oasis Platform, endpoints are collected together in three main groups:
Models: These endpoints list all Oasis models installed on the platform, along with their metadata and auto-scaling configurations.
Portfolios: Designed for the upload, download, and validation of exposure data stored in OED (Open Exposure Data) format. There are also new experimental features that allow running a portfolio deterministically, meaning without a catastrophe model, by assuming a flat loss. This feature is primarily used for testing whether financial terms are applied as expected.
Analyses: This group links a single Portfolio with an Oasis model, which is then used to execute loss generation.
Swagger UI and OpenAPI specification
For easy exploration and interaction with the Oasis Platform’s REST API, Swagger UI is provided. Swagger UI automatically generates interactive API documentation from the API’s OpenAPI specification, allowing developers to visualize and interact with the API’s resources without any implementation logic. By default, Swagger UI is accessible on the server_container:8000 host. When deployed to a cluster, it will be externally accessible via <site domain>/api/. For a full list of all endpoints see (doc link here)
Within Swagger UI, you will find three distinct routes for accessing the API:
<site domain>/api/v1/This route represents the original REST API used on Oasis Platform versions 1.28.x and below. It is maintained for backwards compatibility and is considered frozen and stable. Note that it only supports non-distributed analysis execution, any Oasis models running with run_mode=v2 will not be displayed here.<site domain>/api/v2/This is the actively developed and preferred route for new integrations. All new features and endpoints are introduced here.<site domain>/api/This route provides a comprehensive view, listing all endpoints available in both the/v1/and/v2/API versions.
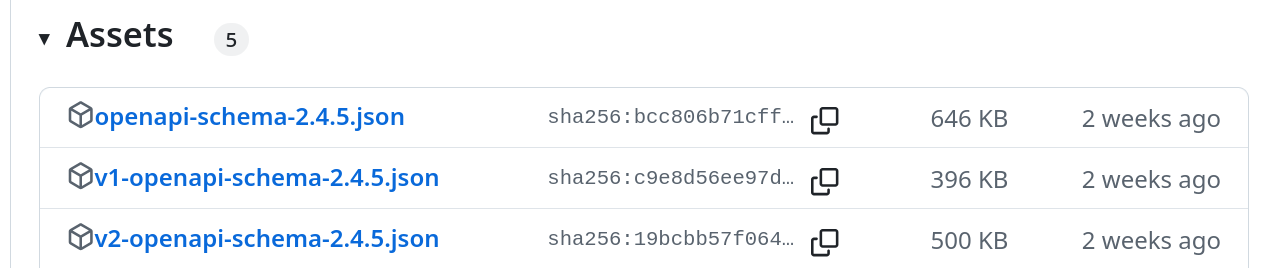
On each release of the Oasis Platform, all three of these API versions are published as OpenAPI specification files and attached to the corresponding GitHub release page for download
OASIS API Models
Model runs mode and celery queues
The OASIS Platform orchestrates the execution of loss modeling tasks through a distributed system involving a central API server and specialized model worker containers. Each Oasis model deploying onto the server will have its own Model Resource within the server’s REST API. and each can be configured to use one of the two execution workflows (single server / distributed)
To dispatch execution tasks, a model must be registered and defined as a Model Resource within the server’s REST API, typically under the /models endpoint.
By default, during platform setup or initial worker registration, a basic model resource may be automatically created. However, for a fully functional and correctly routed workflow, it’s crucial to understand and configure the key fields of this model resource:
{
  "supplier_id": "string",  // A unique identifier for the model's supplier (e.g., 'OASIS', 'CatastropheSolutionsInc')
  "model_id": "string",     // A unique identifier for the specific model (e.g., 'earthquake_europe', 'flood_usa')
  "version_id": "string",   // A unique identifier for the model version (e.g., '1.0.0', '2023-01-beta')
  "run_mode": "V1"          // The operational mode for task execution: 'V1' for single-server, 'V2' for distributed.
}
These three identifiers (supplier_id, model_id, version_id), combined with run_mode, form the unique key within the OASIS API server.
Workflow Modes and Celery Queue Naming
The run_mode selects execution workflow:
V1 (Single Server Workflow):
This mode represents a legacy or simpler execution pathway, typically designed for scenarios where a single worker is sufficient, or for running older worker containers on newer platforms. All worker containers from platform versions (1.28.x) and older are viewed as running in this run_mode
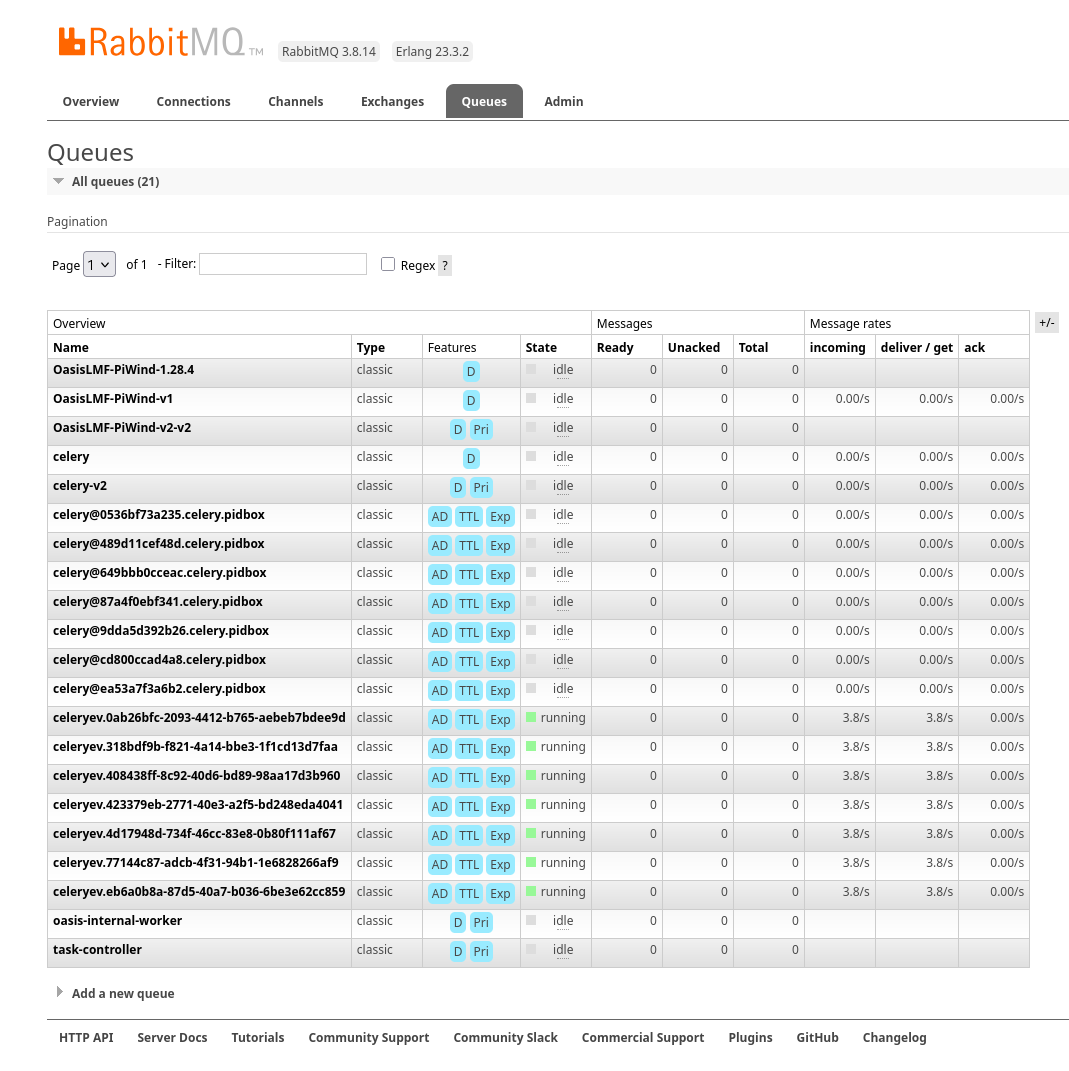
Celery Queue Name: Tasks for V1 models are dispatched to a Celery queue named directly after the model’s identifiers:
<supplier_id>-<model_id>-<version_id>Priority: V1 queues do not support task prioritization. In Celery, a “non-priority queue” works as First-In, First-Out (FIFO). This means tasks are generally consumed by workers in the order they were submitted to the queue.
V2 (Distributed Execution Workflow):
This mode is designed for scaled, high-throughput, and production-grade distributed execution. It leverages advanced features of the OASIS platform, including task prioritization and dynamic worker scaling.
Celery Queue Name: Tasks for V2 models are dispatched to a Celery queue with a -v2 suffix:
<supplier_id>-<model_id>-<version_id>-v2Priority: V2 queues are priority queues, supporting a priority range typically from 1 (lowest priority) to 10 (highest priority). This allows for critical tasks to be processed ahead of less urgent ones.
Mapping Model Resource to Celery Queue
Each Model Resource defined in the API maps directly to a specific Celery queue. This queue is the means through which execution tasks (e.g., for an analysis) are sent. These tasks are then consumed and processed by one or more model worker containers.
Because a model resource dictates the name of the Celery queue to which the server dispatches tasks, and worker containers are configured to read tasks from a specific Celery queue, any mismatch between these two configurations will lead to a stalled workflow.
To prevent such issues, whenever a Model Resource’s configuration is changed in the API, especially its run_mode or any of its id fields (supplier_id, model_id, version_id), the corresponding model worker containers must be reconfigured to match.
Scenario: If the server dispatches tasks to a queue (e.g., my_supplier-my_model-1.0-v2) but the worker is configured to listen on a different queue (e.g., my_supplier-my_model-1.0), the worker will simply never “see” the tasks.
Symptom: An analysis or execution will remain stuck in a QUEUED state indefinitely, as tasks are being sent but never processed.
Example fix:
Option 1: Update a Model Resource in the REST API from run_mode=’V2’ to run_mode=’V1’,
Option 2: Set the container to listen on the ‘distributed execution’ celery queue by setting the environment variable OASIS_RUN_MODE=V2 and restarting the container. This will cause the worker to listen on the new *-v2 suffixed queue.
Celery tasks on a queue are immutable
A fundamental concept in Celery’s operation is that once a task is submitted to the message broker and placed onto a queue, its attributes become immutable. This means that all the parameters and metadata associated with that specific task instance are “fixed” at the point of dispatch and cannot be changed dynamically while the task is awaiting processing or is being executed.
This immutability applies to all Celery tasks, but it’s of particular importance for V2 mode within the OASIS Platform due to its use of priority queues and distributed workflows. Once submitted for execution the following cant be edited.
Priority Value: For V2 tasks, the priority (e.g., a value between 1 and 10) is embedded within the task message itself. The Celery broker uses this value to order tasks within the priority queue.
Number of Workflow Chunks: If a complex workflow is broken down into multiple smaller, independent “chunks” or sub-tasks, the definition of these chunks and their distribution is also fixed within the task’s context.
The only way to effectively change an attribute of an execution request (like its priority) is to stop the current execution and submit a new one with the desired changes. This involves a precise two-step process:
Revoke (Cancel) the Existing Execution Request:
To stop a queued or currently running task, you must initiate a cancellation request. This is done by sending a
POSTrequest to the relevant API endpoint (e.g.,/analyses/{analysis_id}/cancel.The API server will then send a
revokecommand to the Celery system, targeting the specifictask_idof the execution.Upon successful revocation, the broker will attempt to remove the task from the queue (if not yet picked up) or signal the worker to terminate the task (if it’s already executing, though graceful termination depends on worker implementation). This effectively “kills” the original immutable task.
Edit Values and Resubmit the Task for Execution:
After confirming the original execution request has been revoked, you can now modify the relevant configuration options. For example, you would adjust the priority value associated with that analysis (e.g., through the API or the underlying model resource settings).
Once the desired values are updated, you then resubmit the analysis or execution request to the API. This action will create an entirely new Celery task instance with the updated attributes (e.g., the higher priority or revised chunking parameters). This new task will then be placed onto the appropriate queue and processed according to its newly defined immutable state.
API Portfolios
Exposure data is managed within a portfolio resource. It can store the four OED (Open Exposure Data) format file types. These files can be uploaded using POST requests and downloaded using GET requests via the following endpoints:
Location File (loc):
portfolios/{id}/location_fileAccount File (acc):
portfolios/{id}/accounts_fileReinsurance Info File (RIinfo):
portfolios/{id}/reinsurance_info_fileReinsurance Scope File (RIscope):
portfolios/{id}/reinsurance_scope_file
Supported Formats and Compression: The API supports CSV, compressed CSV, and Parquet file formats. For compressed files, the following types are supported: .gz, .bz2, .zip, .xz, .zst, .tar, .tar.gz, .tar.xz, or .tar.bz2. These are the compression types natively supported by the Pandas library.
It is crucial that the compression format matches the file extension in the filename for correct processing (e.g., my_oed_locations.csv.zip). otherwise Pandas might fail to detect the correct compression type.
Requesting Download Format: When downloading an exposure file, you can specify the desired output format (parquet or csv) using the file_format URL parameter. For example: GET portfolios/1/location_file/?file_format=parquet If the original file was uploaded as CSV, the API will automatically convert it to Parquet format before serving the file, and vice-versa.
Linking Existing Exposure: Instead of re-uploading large exposure files, you can ‘link’ existing files into a new portfolio. This is particularly useful for large files (e.g., a 2GB location file) that already reside in the server’s file store (e.g., for STORAGE_TYPE = shared-fs) or are accessible via a remote object storage key (e.g., for STORAGE_TYPE = S3).
To achieve this, first retrieve the storage links of an existing portfolio: GET portfolios/1/storage_links/ This will return a JSON object similar to this, showing the internal file identifiers:
{
  "location_file": "0546911f2ea647cbad4895f28849f910.csv",
  "accounts_file": "1b7604f9f3b24dfbb6010a9ee5cd03ce.csv",
  "reinsurance_info_file": "dbc81c53cabf41daa7144ee3255e3014.csv",
  "reinsurance_scope_file": "5384355123654b1eb7f1945f59317b2b.csv"
}
Then, when creating a new portfolio (POST portfolios/) or updating an existing one (POST portfolios/{id}/storage_links/), you can reference these internal file identifiers:
POST portfolios/
{
  "location_file": "0546911f2ea647cbad4895f28849f910.csv"
}
The response will indicate the newly linked files, often with a modified name to prevent collisions:
{
  "location_file": "0546911f2ea647cbad4895f28849f910.csv_gQCtpWT",
  "accounts_file": null,
  "reinsurance_info_file": null,
  "reinsurance_scope_file": null
}
This process effectively creates a copy of the referenced file and attaches it to the new portfolio without requiring a re-upload.
Running Validation on a Portfolio: Each portfolio resource includes a dedicated portfolios/{id}/validate/ endpoint. A POST request to this endpoint will trigger an ods-tools validation run on all files currently attached to the portfolio. A subsequent GET request to the same endpoint will retrieve the validation status, returning a boolean (true or false) indicating whether the files are valid.
Running a Deterministic Exposure Run: Beyond standard validation, a second level of portfolio validation involves running a ‘deterministic’ loss analysis on the OED exposure files. This type of run proceeds without an Oasis model, instead assuming a flat loss across all locations. The primary purpose is to test the application of financial terms and conditions within the financial module, equivalent to executing oasislmf exposure run in the MDK. A POST request to portfolios/{id}/exposure_run will initiate this exposure run, and a GET request to the same endpoint will retrieve the generated output.
Performing Data Transformation: The Data Transformation tool can be accessed via the API at portfolios/{id}/exposure_transform. This endpoint facilitates the conversion of exposure files from one format to another, for example, from ‘AIR Cede’ to ‘OED’. For more detailed information on the functionality and usage of this tool, please refer to the ODTF documentation.
API Analyses
The Oasis loss analysis is a structured, two-step process that takes in exposure data, and returns a compressed archive with loss estimates in an Open Results Data (ORD) package.
The first step in triggering a run, is creating an analysis resource in the API by calling a POST to the analyses/ endpoint.
There are three required fields:
Analyses Name
Model ID
Portfolio ID
This links a specific Oasis model to an uploaded portfolio of exposure data using their respective resource IDs.Here’s a representation of a newly created analysis object:
{
  "name": "new analysis name",          // A user-defined name for this analysis
  "portfolio": "<linked portfolio id>", // The unique ID of the exposure portfolio to be analyzed
  "model": "<linked oasis model id>",   // The unique ID of the Oasis model to be used
  // ... additional analysis fields ...
}
Upon successful creation, the analysis will initially have a status of NEW. This is the field that tracks the current state of a loss analyses
Flow of an execution
For all Oasis workflows, regardless of whether you’re using V1 or V2 modes, the execution is logically divided into two distinct and dependent sequential steps: Input Generation and Loss Generation. To successfully calculate the losses, the Input Generation step must be completed first and without error.
1. Input Generation: Pre-Processing Exposure Data
This first step prepares your exposure data for the Oasis model. It is triggered via the API endpoint:
analyses/{id}/generate_inputs/
This API call directly maps to the Model Development Kit (MDK) command generate-oasis-files. The process consumes:
OED Exposure Files: A set of Open Exposure Data (OED) files, with a location file being a mandatory requirement. These files describe your assets and their characteristics. (for cyber models the accounts file is mandatory)
Analysis Settings File (Optional): For more complex models, an optional JSON-formatted analysis settings file can be provided. This file can contain additional parameters that influence the input generation process.
The successful completion of this pre-processing step results in the creation of a inputs.tar.gz archive, which can be retrieved from:
analyses/{id}/input_file/
This archive stores the intermediate Oasis files necessary for the subsequent loss generation, including:
Keys Data: A vital component that identifies which specific exposure locations within your portfolio are covered by the selected model and which supported perils they are susceptible to.
Input files for the Oasis execution kernel.
Meta-data, exposure summary and locations executed from the model.
Disaggregation Data (Optional): If the Oasis model supports it, this step might also perform the disaggregation of the input exposure data, breaking it down into finer granularities as required by the model’s methodology.
All analysis states related to this initial generate_inputs step are prefixed with INPUTS_GENERATION_, followed by their specific status:
INPUTS_GENERATION_QUEUED: The request to generate inputs has been received and is awaiting processing.
INPUTS_GENERATION_STARTED: The input generation process is actively underway.
INPUTS_GENERATION_ERROR: An error occurred during the input generation. Error traces stored in /analyses/{id}/input_generation_traceback_file/
INPUTS_GENERATION_CANCELLED: The input generation process was explicitly canceled.
2. Loss Generation: Executing the Model and Producing Results
This is the second and final execution step, where the Oasis model performs the core loss calculations. This step is only enabled after the generate_inputs step has successfully completed and the analysis is in the READY state. It is initiated via the API endpoint:
analyses/{id}/run/
This API call maps directly to the MDK command generate-losses. For this step to proceed, it requires:
The previously generated inputs.tar.gz file, which contains all the necessary pre-processed data.
Execution Settings: These are critical parameters for the loss generation process, stored in JSON format and posted to analyses/{id}/settings/. They dictate how the model should perform its calculations (e.g., number of simulations, output formats).
States related to this run execution phase are prefixed with RUN_, followed by their specific status:
RUN_QUEUED: The loss generation request has been received and is awaiting execution.
RUN_STARTED: The loss generation process is actively running.
RUN_ERROR: An error occurred during the loss generation, preventing successful completion. Error traces stored in
RUN_CANCELLED: The loss generation process was explicitly canceled. Error traces stored in analyses/{id}/run_traceback_file/ explicitly with kernel execution logs stored in an archive under analyses/{id}/run_log_file/
RUN_COMPLETED: The loss generation process finished successfully, and results are available.
Once an analysis has successfully completed the loss generation (RUN_COMPLETED), its results become available for download from:
analyses/{id}/output_file/
This endpoint provides an output.tar.gz archive containing the final loss results, typically in either CSV or Parquet format.